

Like most things in life, there is not one “right” way to build a campfire. Some of us might use flint (my brother-in-law) while some of us might use jet fuel (my father). I fall somewhere in the middle and have successfully started many fires...even in the rain!
At summer camp (www.lutherlyn.com), I was taught the “dead, down & brown”rule. This rule can probably apply to other, more unpleasant things (anyone else picturing decaying groundhogs on the side of the road? Well, now you are!), but for this particular lesson... let’s apply it to wood :) You absolutely do not want to attempt to burn twigs pried off of trees, rotting/wet limbs, nor recently fallen branches. You might succeed in getting a lot of smoke, but not much fire!
Ideally, you will find branches that fell awhile ago, but are not completely touching the ground and therefore moist. One exception is the small, dead twigs at the base of pine trees! Snap those babies off for great tinder.
You need 3 types of wood:
 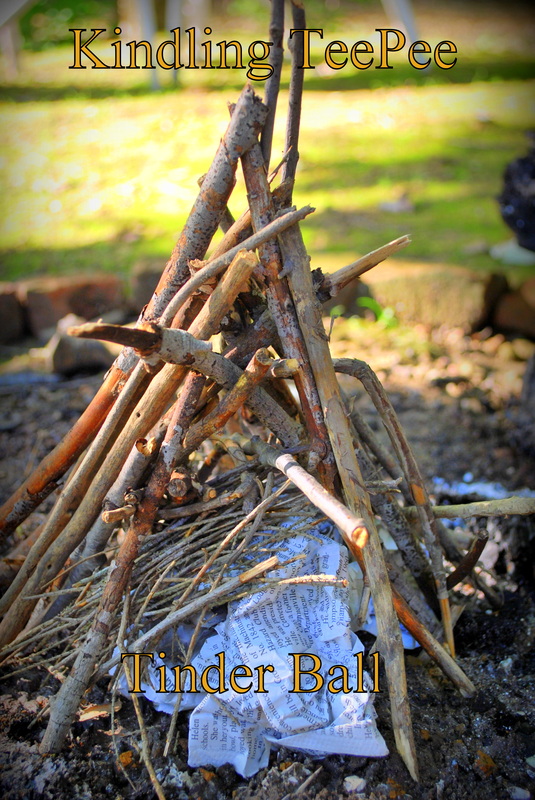 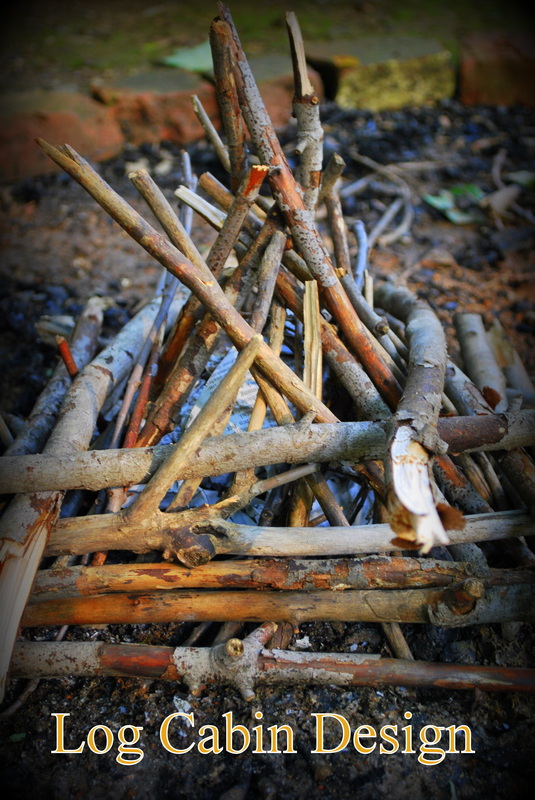 | Tinder: things that burn immediately from the match. This includes paper clip thin branches, grape vine peelings, dead leaves, entire newspapers (raising hand), dead grasses, etc. Kindling: sticks that are 1”diameter or less. Fuel: Large, thick sticks and logs that keep the fire going. How to build a campfire 1. Collect a bunch of each of the three types of wood and lay them in separate piles next to your fire pit. When you think you’ve collected enough wood, you’re probably ½ way there. There’s nothing I like less than collecting firewood, after my first attempt fizzled because I didn’t gather enough tinder and kindling. If you don’t have a fire pit, clear a place using your heel as an anchor, pivot in a circle so that your foot creates a circle (your heel is the center of the circle, your toes make the outer edge). This creates a place for your fire that is free from debris. If you have time, line the outer edges of your circle with stones to help keep coals from rolling out of the fire and onto any nearby flammable debris. 2. Start small! Grab a handful of tinder and loosely pack it into a ball. LOOSE is key because oxygen needs to be able to get to the center of the tinder. Oxygen fuels fire! Strike a match and start your fire. Remember the fire burns from the inside out. So, if your fire is struggling, don’t lay extra tinder on TOP of the kindling! Use a stick to shuffle the wood around until you can get the tinder back under the kindling. 3. Make a teepee. CAREFULLY place small pieces of kindling against your tinder ball. As the fire catches and grows, add more & bigger kindling to make a stick teepee. 4. Release your hot air :). Oxygen at the BASE of the fire is key. Gently blowing on your tinder will make the fire burn hotter and faster. Once your fire is established, occasionally fanning the base of the fire with a folded newspaper or plate will give it a nice boost. When blowing on the fire, please be careful not to get light-headed. If there’s one place you don’t want to faint, it’s while leaning over a fire! 5. Optional: upgrade to a log cabin. Just like the early settlers of our country, you may find log cabins to be a nice fit. Especially good for campfire cooking because the spaces between the logs allow for access to the hot coals in the center. In the picture, I started a log cabin design using kindling. I actually rarely use log cabins and in the fire pictured, dismantled it for the actual fire so that I could add those sticks to the teepee. I find that the log cabin design only works after the fire is strong and well-established. 6. Optional: create a lean-to. This is my favorite way to add fuel to the fire. Lay an extra large piece of fuel along one side of your fire and then smaller pieces of fuel parallel with one end on the extra large piece and the other end on the ground. The center will be directly over your established, burning teepee. One secret to this approach is to continue to feed the teepee kindling until the fuel logs are burning well at the end touching the ground. Otherwise, the teepee will burn out and you’ll be left with logs that are too high off the ground to benefit from the burning coals. One last tip: With enough dry tinder, you CAN start on damp ground with damp kindling and fuel. To increase your odds of success, build a platform for your fire using kindling. Simply lay kindling side by side and starting with your tinder ball, build your fire on top. This not only makes for a drier base, it also makes it easier to get oxygen to the base of the fire. |
What’s your best fire-started-against-all-odds story?


 RSS Feed

