ThrivingLife.co
  • THRIVE Life
  • Lazy Green Mama
  • About

Patriotic Chocolate Covered Strawberries

8/31/2013

0 Comments

 
Author's note:  Like the Strawberry Granita, this post was meant to be published during June or July... do to family circumstances, that didn't happen.  However, it's still a great idea for any upcoming picnics and/or "Pin" or bookmark this idea for next year :)
Picture
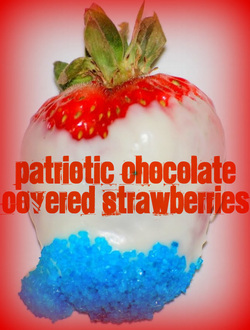
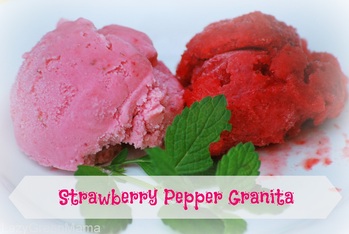
Is there anything better than a fresh strawberry?  How about a chocolate covered strawberry?  How about a red, white & blue strawberry?  Oh my... I think we all need to eat a batch of these right NOW!

Guaranteed to deliver the “WOW” factor at any patriotic gathering and shh... don’t tell, but this is the easiest dessert you’ll ever make!

Ingredients:
  • A pound fresh or freeze dried of strawberries (about 24)
  • 16 ounces of white chocolate
  • 2 Tablespoons of shortening
  • ¼ cup of blue sugar crystals
  • wax paper


Picture
DIRECTIONS:

1. Wash strawberries, leaving the leaves in place.  Lay the strawberries in a single layer on paper towels. 
*Chocolate will NOT stick to strawberries if there is any moisture on the berry!
**If using freeze dried whole berries, do not wash first!  These are DELICIOUS crunchy treats!
2. Place the chocolates in a microwaveable bowl that will not get too hot to touch 
    a. Put microwave on 50% power (if your microwave doesn’t have a low power                 setting, check and stir your chocolate more frequently)
    b. Microwave chocolate in 30-60 minute increments, stirring and rotating the bowl           between each session.  
     c. Finish heating the chocolate when just a small amount of chocolate chunks remain (typically between 3-4                   minutes).  Stir chocolate until uniformly melted and smooth.
3. Holding strawberries by the stem, dip the strawberries into the chocolate until at least ¾ of the strawberry is covered in chocolate.
4. Immediately dip into the blue sugar crystals
5. Lay on wax paper and leave until the chocolate hardens
*It’s not ideal to refrigerate chocolate covered strawberries as moisture gathers on top of the chocolate.  If possible, make this dessert right before your party and/or leave them in a cool place in the house until ready to eat (I actually put the tray in my air conditioned bedroom for a few hours!).  
6. Put on a plate or serving tray and ENJOY :)

This dessert was inspired by this picture:  http://allrecipes.com/Cook/Photo.aspx?photoID=428300


Buy Freeze Dried Strawberries
What will you be doing this Labor Day Weekend?

Bon Appetit,
Picture
0 Comments

THE REUSABLE SNACK BAG AND SANDWICH WRAP TUTORIAL

8/28/2013

2 Comments

 
Lesley, our fitness and Etsy expert is back with perhaps the best tutorial I've ever seen.  She poured her heart into this one folks, who is going to join me in making a set of these?  Granted, I'm lucky enough to have two Rugrat Design snack bags that we use ALL.THE.TIME!  Perfect for on the go snacking :)
Picture
__ For those of us with school age children….the time has come….summer is over and it is time for back to school. There may have been tears (theirs or your own) or there may have been celebratory moments (again, theirs or maybe your own too!) Regardless of how it happened….it happened….the school supplies were purchased, first day of school outfit selected and laid out, teachers and schedules assigned and just like that- the 2013-2014 school year began. Along with those supplies, book bags, “perfect shoes” and the coolest styles comes the lunchbox. And that is where the subject of this month’s entry begins….

If you’re reading this blog- it means you are at least partially green. If you were looking for the “How to fill the landfill ASAP” blog- you’re in the wrong spot. So- back to that lunchbox. In packing daily lunches for my daughter I was determined to do my part to be a little more green. I went a tad crazy seeking the perfect lunchbox.  My daughter is carrying a Goodbyn lunchbox this year and so far I pretty much have a crush on the thing. Truly.

In addition to this lunchbox, we use reusable sandwich wraps and snack bags instead of ziplocs, foil or saran wrap when I pack lunch and snacks. We also use a reusable drink bottle instead of juice boxes. Since I can’t tell you how to make a drink bottle, you’ll just have to go to Target to get one of those bad boys. But, as the woman behind Rugrat Design. I CAN tell you how to make the reusable wraps. So I will do that. That’s right, I’m telling you how to make something instead of sending you to my shop to buy it. Aren’t I nice!? For those of you who don’t sew or don’t want to- then just head right over and do your shopping and I’ll happily make it and mail it to you :)

So, shut up already Lesley and tell me what to do. OK. I hear ya!

With no further ado….THE REUSABLE SNACK BAG AND SANDWICH WRAP TUTORIAL This is my first tutorial and therefore I request your patience as it may be a tad wordy. But I promise you, at the end, you will have a reusable snack bag and sandwich wrap and you can send stylish and green lunches for your Rugrat (or yourself!) Goodbye waste…hello style!


_This tutorial will result in 1 reusable snack bag and 1 reusable sandwich wrap.
Click here to shop Goodbyn lunchboxes
Picture

Read More
2 Comments

Back to School Special :: Quick & Healthy Meal Plan

8/26/2013

1 Comment

 
Picture
It's that time of year... dun dun DUN!  This time of year brings so many feelings:  excitement for new things, sadness for losing free time, wonder over the enormous changes my kids will grow into, and STRESS over HOW WILL I MANAGE TO CLEAN THE HOUSE, DO LAUNDRY, FEED MY FAMILY AND WORK!

Do you hear me on that?  Can I get a "HECK YEAH?"

Fortunately, I have some secret weapons... and (spoiler alert), it's all freeze dried!


Quick and easy breakfast:
Scrambled egg mix with freeze dried sausage crumbles, freeze dried spinach.

Midmorning snack:
Strawberry yogurt bites

Lunch:
Chicken Salad on crackers & dried fruit (I'm craving fuji apples and peach slices)

TO MAKE (this makes A LOT... I often halve or quarter it):
2.5 cup freeze dried chopped chicken
1/2 cup freeze dried chopped onion
3/4 cup freeze dried celery
2 cup water

Add water to chicken, onion & celery.  Stir well and chill for 10 minutes. 
Mix 3/4 c mayo, 1 Tbsp dijon mustard, 3/4 tsp salt & 1/4 tsp pepper until well mixed.  Combine with chicken mixture, do not drain.  Chill in fridge for 1.5 hours till thickened.

Afternoon Snack:
GORP (trail mix) with added freeze dried blueberries & mangoes with Thrive Classic Lemonade

Dinner:
Southwest Chicken and Rice burritos & Thrive Fudge Brownies

TO MAKE:  Make the Thrive Express Southwest Style Chicken and Rice (simply add water and simmer for 15 minutes).  Scoop into tortillas and top with shredded cheddar cheese and salsa.

Now put up your feet and RELAX (perhaps with an extra brownie and glass of pinot noir)!

Bon Appetit,

Picture
1 Comment

Anyway Pasta Salad

8/24/2013

0 Comments

 
Picture
One of our favorite family musicians is Billy Jonas.  His song "Any Way You Go You're Gonna Get There" makes me think of all of my pasta salad success stories of late.

RANDOM?  Perhaps, but this is the way my brain works!

For this salad, you truly let your taste buds guide you.  Typically I NEED a recipe to follow, at least loosely.  But with a pasta salad, you simply need pasta, a sauce and then add-ons.  It can be different every time and it'll always be awesome!  When using Thrive ingredients, this healthy meal takes only the length of time needed to boil the pasta!  

ANY WAY YOU GO PASTA SALAD is my new "go to" easy meal.  Unfortunately for you, it's not an exact science... but it's going to end up delicious, that I can promise!

HOW TO:
  1. Start with your favorite pasta noodles, make at least 1.5 times the serving suggestions so that you have left overs!
  2. Choose your sauce.  The easiest (and tastiest) has been when we used Thrive Bechamel (alfredo) Sauce.  That sauce takes 2 minutes to whip up and provides the perfect creamy sauce for this hot or cold salad.
  3. PROTEIN?  Want to add some proteins?  We scooped in some Thrive chopped chicken.  Add this to your boiling pasta water during the last 5 minutes OR set in it's own bowl of room temperature water for about 20 minutes (that's what's reconstituting in the measuring up to the right).
  4. VEGGIES!  This is the fun part, if you have THRIVE in your pantry!  Choose your favorites and simply throw them into the boiling pasta water for the last minute before draining.  I've used:  corn, peas, onions, celery, broccoli, asparagus...
  5. Drain your masterpiece, mix in your sauce, add a little Thrive Chef's Choice Seasoning Blend (or salt and pepper if you haven't bought Chef's Choice yet... I promise you'll use it OFTEN!).  Top with Parmesean OR Feta cheese if desired (depending on what type of salad you're going for.  Pictured to the right is a "greek salad" I experimented with...YUM!

*If you want to use fresh ingredients, go for it!  Simply wash, chop and still add during the last minute or two of boiling pasta water to soften the veggies.

My mom made the pasta salad featured above and made SO much that the next day she took it to a friends' house, warmed it up, added more Bechamel and feasted.  That friend has since been enjoying the leftover leftovers as a cold salad for lunch...as have I!  Perfect for my first week back at school.  YUM!
Picture
Picture
Picture
Buy Thrive
Picture
0 Comments

Angelina Ballerina Birthday Party

8/19/2013

0 Comments

 
Picture
We had so much fun with this party theme for Hazel's 4th Birthday!  She has always loved watching Angelina Ballerina on Netflix and when I realized that my niece who really really loves Angelina was going to be visiting a few weeks before Hazel's birthday... well, an early party was immediately planned!

My sister is one of those crafty type who throws things together without much thought or planning and everything looks amazing.  I'm one of those "copy ideas to a tee off of Pinterest" crafty types.  Together, we were a tad exuberant.  

The hardest part was deciding when to call it quits :)  We focused on shades of pink, polka dots, ballerinas & mouselings.

Details:  
  • Perhaps my most brilliant idea ever:  call local dance studio (Studio 22 in Franklin, PA) and ask to rent the space for an hour and hire a student teacher!  This cost me $30 + teacher donation.  WAHOO!  This really helped minimize decorations & stress since I wasn't hosting guests in my house (cleaning & prepping for a party while living with wee guest of honor = chaos).
  • shimmery pink & white tutus with a flower around the waist like Angelina (note: to make easy tutus, purchase 1-3 colors of coordinating tulle, cut into strips, tie onto elastic headbands, glue fake flower on waist.  For ballerina tutus, less is more... you want to be able to see their legs through the skirt!)
  • Mouse headbands made with shimmery cardboard and white foam board hot glued onto inexpensive headbands (note, cut circles out of foam board, snip the bottom of the circle off, cut a 1" perpendicular slit in the ear, hot glue bottom sides so they overlap, THEN hot glue onto headband.)
  • polka dot wrapping paper for the tables & covering drink labels
  • pink polka dot gift bags full of pink candies, cheese snacks & ballerina stickers
  • cardboard cut-outs of Angelina and her friends (they lined the entrance).  I scored that find at our local Ollie's store where they had many Angelina books.  The cardboard cut-outs came from the book "The Nutcracker Sweet"
  • pink balloons
  • cheese, cheese & more cheese for lunch:  cheese puffs, cheese sandwich crackers, ham & cream cheese tortilla rolls, egg salad sandwiches, mini babybel cheese & pink cupcakes with pink sprinkles (Hazel's one request).
  • My sister and I simply couldn't resist and put together our own Miss Mimi outfits.  I think it was lost on the kids, but we sure had fun!
Picture
Picture
Hazel trying on her new ballet shoes; learning their positions; Annie, Hazel & Heidi with balloons; Hazel twirling; ballet teacher arranging feet in proper position; spinning in circles were their favorite; Marianne and Annie; me taking a self pic in mirror copying Annie's positions; graceful Hazel attempting a plie; Grandma Llama spinning Heidi; Hazel enjoying her cupcake.
Picture
0 Comments

Major sale on THrive Life Products!

8/15/2013

0 Comments

 
Picture
Picture
Oh my...this is a GREAT surprise!  Thrive is offering some of their MOST POPULAR foods, storage systems & emergency supplies at deeply discounted prices!

HURRY... there are limited quantities!  I suggest trying some of the Neaopolitan Bits (save almost $10!) and snagging some Pantry Plus Cansolidators (save $30!) so you can {finally} tackle that "organize the pantry" goal!

These prices are the same whether you buy online or contact me to place your order. 

Shop Now!
0 Comments

Cheap & Effective Foaming Soap

8/14/2013

0 Comments

 
Picture
This is one of those things that I've been doing for so long that I forget it's a good idea :)  So, just in case you're still buying foaming soap dispensers and/or using full strength shower gel, let me help you save some money!

Materials:
  • Shower gel.  I prefer to use Dr. Bronner's soaps because it's perfect for hand washing, shower gel, baby wash, face wash...and in a pinch:  shampoo & toothpaste!  In this pic I'm using Lavender which is my summer scent as it's a natural bug repellent.  My husband's favorite is the classic peppermint... it's OH-SO-TINGLY and refreshing!  
  • H2O.
  • Foaming soap dispenser.  If you don't have one, no problem.  Just go buy a foaming soap from the store (Bath & Body Works has a nicely shaped one).  Once you finish with the contents, simply peel off the label, rinse and reuse.
How to:
Fill 1/4 with shower gel and slowly add water until it reaches the top.  

That's it!  Kind of embarrassing if you've been buying foaming soap all this time and/or using full strength shower gel, eh?

What's your favorite shower gel scent?

Picture
0 Comments

Egg Carton Flowers

8/12/2013

0 Comments

 
Picture
When I saw this picture on Pinterest, I couldn’t wait to begin! 

Unfortunately, it was only a picture and didn’t link to a tutorial.  Since I happen to have A LOT of egg cartons at my disposal (my husband raises chickens for a hobby), I decided to dig in and see what I could come up with.

Not too shabby, if I say so myself!

My toddlers had a blast painting the egg cups!  Instruct them to swirl their paint brush in each egg cup until the entire cup is covered in paint.  I’ve found that using cups of paint with color coded paint brushes really helps to keep the paint colors from all being mixed into a lovely shade of brown.

Let the painted egg cups dry and then enlist the help of a much older child.  I didn’t have that option and whew... cutting egg cartons into flowers was some fierce hand exercise.  Of course, you might not attempt to make 4 dozen flowers in one sitting ;)

As I cut the egg cups out of the carton, I rounded the edges and then snipped “petals”around the edges.  The petals are made by making small cuts from the edge of the cup toward the bottom.  Carefully fold those back and VOILA... a flower!  

I also played around a little bit with cutting some of the egg cups really short and using them as the middle.  This was nice especially for cups that needed more color.  You could incorporate any scraps from other crafts.  I let my toddler choose some fuzzy balls for the middle of her flowers.  

To finish them off, I put a big glob (technical term) of hot glue on the back of the flower and held a pipe cleaner in place until the glue hardened.  

Now, tie with twine for a sweet bouquet or simply plop them in a vase.  Flowers that don’t need water and won’t die or disintegrate because I forgot to take care of them... now that’s a flower I can get behind!

recap:
1.  SUPPLIES:  egg carton, multi colored paints & brushes, scissors, pipe                  cleaners, hot glue
2.  Paint each egg cup with paint.  The more colorful, the better!
3.  Once paint dries, cut each egg cup out of the egg carton.
4.  Trim the top of each egg cup so that the top is a clean circle.
5.  Snip the flower petals by making small, straight snips from the top edge of the        cup towards the center.
6.  Carefully fold the cardboard back between each snip.
7.  Add any extra decorations to your flowers (fuzzy ball centers, spiraled wire            centers, etc.)
8.  Using hot glue, glue a pipe cleaner to the BACK (unpainted) of the flower.  Hold      in place until glue hardens.
9.  Repeat for the remaining 11 flowers :)  


Picture
Picture
Picture
Picture
Picture
Picture
0 Comments

Strawberry Pepper Granita

8/9/2013

0 Comments

 
Author's note:  This post was written last year and I, er, forgot to post it.  This year I missed strawberry season :(  Please be sure to "Pin" or bookmark this post and we'll compare notes next June!
Picture
We are lucky enough to live near a strawberry farm.  For the past few years, I haven’t picked my own... choosing to pay a little more for the pre-picked strawberries.  However, now that my girls are old enough to “help”, this year we picked our own!

YUM!  While the girls ate their weight in strawberries (sorry farmer!), I filled two HUGE baskets.  Overly ambitious?  Definitely!  However, I’ve always wanted to be a true farm girl, so I set out to make my first batch of strawberry jam, strawberry syrup, strawberry ice cream (the left scoop in the photo) & my new favorite:  STRAWBERRY PEPPER GRANITA.

I know what you’re thinking, “What does she mean pepper?”.  I mean GROUND BLACK PEPPER.  Weird, but DELICIOUS!  The flavors truly complement each other.  You may also be thinking “What is a granita?”.  

Granita is basically just a frozen, crushed dessert (think thick daiquiri).  In the August 2011 issue of MaryJanesFarm, Mary Jane shared a few granita recipes and I was so intrigued by the strawberry & pepper combo, that I ripped it out and saved it for the next strawberry season.  

Here’s the recipe as found in MaryJanesFarm:

Picture

Strawberry Pepper Granita

Ingredients
1 cup hot water
¾ cup sugar
2 T fresh lemon juice
½ t ground pepper
3 cups strawberries, sliced (substitute THRIVE sliced strawberries for a year-round fresh treat!)

Directions
In a small bowl, stir together water, sugar, lemon juice, and pepper until sugar dissovles.  In a food processor (I used immersion blender), blend strawberries until smooth.  Add sugar syrup and blend until combined.  Pour into an 8” square baking and freeze.  Stir and crush lumps with a fork every hour until evenly frozen, about 3 hours total.  Scrape with a fork to lighten texture, crushing any lumps.  Spoon into glasses or bowls and serve with a spoon.


Have you ever added an odd flavor to a dessert and discovered an amazing combo?


Bon Appetit,

Picture
Picture
Buy Thrive Strawberries
Picture
0 Comments

Toddler Music ::  'tis a gift to be simple

8/6/2013

2 Comments

 
Picture
"Sing, sing a song.  Make it simple, to last a whole life long."  (song lyrics from Karen Carpenter)

Thanks to Pandora, my kids are exposed to a lot of great toddler tunes.  Music for kids can be silly, calming, repetitive or tell stories.  There is so much great stuff out there, but today I want to encourage you to go BACK TO THE BASICS.

One important consideration for developing voices is the quality of singing that they are exposed to.  I LOVE to jam to my favorite bands while I'm driving or cleaning, but I don't want those voices to be the only ones my toddler hears.  Toddlers MIMIC and so what they hear is so important.  Those tiny voices shouldn't be straining to match a gravely, shouting, or emblishment crazed soprano voice.  Look for artists who sing in the middle range, whose voice is pure w/o computer enhancements and whose words are clearly understood.

One great example of the type of singing to expose your child to is Jill Trinka.  Hop on over to Amazon to hear clips of some of her recordings, or purchase through one of my affiliate links to the right (THANK YOU!).

One of my favorite songs to sing with kids is "Simple Gifts."  A traditional Shaker dance song, this simple song is easy to sing and provides a great basis for later study of American folk culture.  Though she hasn't memorized the words yet, my toddler LOVES to dance to this song.  Similar to "Ring around the Rosy" (another historical dance song sung in a modest range), this song is great for twirling!

Text:


'Tis the gift to be simple, 'tis the gift to be free
'Tis the gift to come down where we ought to be,
And when we find ourselves in the place just right,
'Twill be in the valley of love and delight.
When true simplicity is gain'd,
To bow and to bend we shan't be asham'd,
To turn, turn will be our delight,
Till by turning, turning we come 'round right.

Here's a nice rendition by another favorite female vocalist of mine, Alison Krauss:

Picture
2 Comments
<<Previous
    Thrive LGM Sale Prices!

    Enter your email address:

    Delivered by FeedBurner

    Picture


    Lazy Green Mama

    Promote Your Page Too

    RSS Feed


    Categories

    All
    Birth
    Bravelets
    Cheap & Creative
    Cloth Diaper
    Etsy
    Fitness
    Food
    For The Baby
    For The Earth
    For The Home
    For The Kids
    For The Mama
    Get Outdoors
    Giveaway
    Life
    Medley Acres
    Oils & Herbs
    Preparedeness
    Shelf Reliance Sale
    Thrive Basics
    Thrive Dairy
    Thrive Fruit
    Thrive Grains
    Thrive Life Team
    Thrive Meals
    Thrive Proteins
    Thrive Vegetables

    Grab my Button!

    Lazy Green Mama

    Archives

    February 2015
    August 2014
    June 2014
    March 2014
    February 2014
    December 2013
    November 2013
    October 2013
    September 2013
    August 2013
    July 2013
    June 2013
    May 2013
    April 2013
    March 2013
    February 2013
    December 2012
    November 2012
    June 2012
    May 2012
    April 2012
    February 2012
    January 2011
    November 2010
    October 2010
    September 2010
    August 2010
    July 2010
    June 2010
    May 2010


    Header/Button designed by South of Sheridan

    Image Credits: IStock

    Share
Powered by Create your own unique website with customizable templates.